Planning a luxury master suite renovation or new build? The floor plan sets the foundation for everything that follows, from how you move through the space each morning to whether your closet can actually fit your wardrobe. A well-designed luxury master suite isn’t just about square footage: it’s about creating distinct zones for sleeping, bathing, dressing, and relaxing that work together seamlessly. This guide breaks down the essential components, popular layout styles, space requirements, and practical design strategies to help you plan a master suite that balances high-end aesthetics with real-world function.
Table of Contents
ToggleKey Takeaways
- Luxury master suite floor plans should prioritize distinct zones for sleeping, bathing, dressing, and relaxing, typically ranging from 500–700 square feet for comfort and 800–1,200 square feet for high-end custom designs.
- Walk-in closets in luxury master suites require a minimum of 80–100 square feet but ideally 150–250 square feet, with features like islands, full-length mirrors, and direct bathroom access for seamless morning routines.
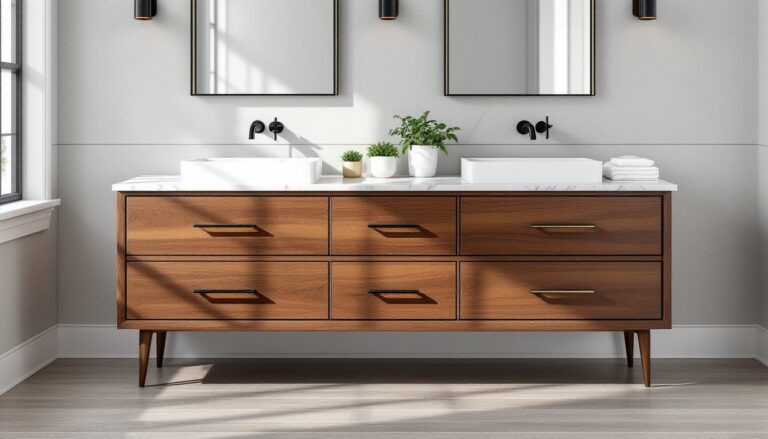
- Spa-inspired ensuite bathrooms should separate wet and dry zones using dual vanities, freestanding tubs with 5 × 7-foot footprints, and large walk-in showers (4 × 6 feet minimum), positioned near windows for natural light and privacy.
- Choose between popular layout styles—open-concept spa, traditional separated, hotel-inspired, dual-sided, or retreat-style—based on your lifestyle, privacy needs, and available square footage.
- Maximize comfort through strategic lighting zones, soundproofing with STC 50+ insulation, dedicated HVAC zones for temperature control, and comprehensive electrical planning including outlets every 12 feet plus USB charging stations.
- Mock up the floor plan using painter’s tape before construction to test traffic flow and daily routines, ensuring the luxury master suite balances high-end aesthetics with real-world functionality.
What Defines a Luxury Master Suite Floor Plan?
A luxury master suite goes beyond a bedroom with an attached bathroom. It’s a self-contained private retreat that typically includes multiple dedicated zones: a sleeping area, an ensuite bathroom, a walk-in closet or dressing room, and often a sitting area, coffee bar, or home office nook.
Square footage is the most obvious differentiator. While a standard master bedroom runs 200–300 square feet, luxury suites typically start at 400 square feet and can exceed 1,000 square feet in high-end custom homes. But size alone doesn’t make a suite luxurious, layout efficiency and thoughtful zoning matter more than raw dimensions.
Separation of functions is key. Instead of a bathroom door opening directly beside the bed, luxury floor plans use hallways, pocket doors, or separate vestibules to create visual and acoustic privacy. The toilet and shower are often enclosed in their own compartment within the bathroom, a layout borrowed from European hotel design.
High-end finishes and built-ins are assumed: custom cabinetry, stone counters, hardwood or engineered flooring, and integrated lighting. But the floor plan itself should accommodate these features, allocating wall space for a statement headboard, planning alcoves for built-in seating, or designing the bathroom layout to support a freestanding tub as a focal point.
Finally, luxury suites prioritize natural light and views. Floor plans often position the bed to face windows or French doors leading to a private balcony or patio, while bathrooms incorporate large windows or skylights without sacrificing privacy.
Essential Layout Components for High-End Master Suites
Walk-In Closets and Dressing Rooms
A true luxury suite includes a walk-in closet sized more like a boutique dressing room. Expect a minimum of 80–100 square feet for a functional walk-in, but high-end designs often allocate 150–250 square feet or more, especially in homes inspired by luxury mansion aesthetics.
Layout options include:
- Single-sided walk-in: Shelving and hanging rods along one wall with a center aisle (6–8 feet wide minimum).
- Double-sided walk-in: Rods and shelving on parallel walls with a central passage (requires 8–10 feet of width).
- U-shaped or L-shaped dressing room: Maximizes storage along multiple walls, often with a central island for folded items, jewelry, or accessories.
The closet should connect directly to the bathroom to create a morning-routine flow: dress, groom, exit. Some floor plans position the closet as a pass-through between bedroom and bath: others place it off a private hallway to avoid traffic through sleeping areas.
Include these features in your floor plan:
- Island or peninsula (minimum 4 × 6 feet) with drawers for accessories
- Full-length mirror with at least 3 feet of clearance in front
- Built-in hamper or laundry chute
- Seating area or ottoman (12–18 inches deep)
- Electrical outlets for charging stations or steamers
Spa-Inspired Ensuite Bathrooms
Luxury ensuite bathrooms typically range from 120–250 square feet, with layouts that separate wet and dry zones. The most effective designs treat the bathroom as a series of stations rather than a single open room.
Core elements:
- Dual vanities: Plan for 60–72 inches per person, with 30–36 inches of counter depth. Place vanities on the same wall for plumbing efficiency, or opposite walls for a symmetrical, hotel-style layout.
- Freestanding or soaking tub: Requires a 5 × 7-foot footprint minimum, including circulation space. Position near a window or under a skylight when possible.
- Walk-in shower: Minimum 4 × 6 feet, but luxury designs often go larger (6 × 8 feet or more) to accommodate bench seating, multiple showerheads, steam features, or body sprays.
- Private water closet: Enclosed toilet compartment (minimum 3 × 5 feet) with pocket door to save space.
Material and code considerations:
Use cement board or waterproof membrane behind all tile in wet areas. Plan electrical for GFCI outlets near vanities (NEC requires outlets within 3 feet of basin edges). Include blocking in walls during framing for grab bars or wall-mounted fixtures, it’s easier than retrofitting later.
Shower floors require a minimum 2% slope toward the drain. If you’re planning a curbless walk-in shower, you may need to lower the subfloor in that area, which affects structural planning.
Popular Luxury Master Suite Floor Plan Styles
Open-concept spa suite: The bedroom flows into the bathroom with minimal separation, perhaps a half-wall, glass partition, or freestanding tub serving as a visual divider. Closets are hidden behind floor-to-ceiling doors or accessed via a discreet hallway. Works best in modern or minimalist homes where the aesthetic is clean and uncluttered. Privacy depends on living alone or with a partner who shares your schedule.
Traditional separated suite: Bedroom, bathroom, and closet are distinct rooms connected by doors and short hallways. This layout offers maximum privacy and noise isolation, making it ideal for couples with different routines. It’s also easier to heat and cool individual zones.
Hotel-inspired layout: A central hallway or vestibule connects the bedroom to the bathroom and closet, often with a small sitting area or coffee bar tucked into the passage. Many master bedroom designs in high-end homes follow this model because it feels luxurious and organized.
Dual-sided suite: His-and-hers closets flank the bathroom, each with its own entry from the bedroom. The bathroom sits in the middle with dual vanities on opposite walls. Common in custom homes over 4,000 square feet.
Retreat-style suite with sitting room: The sleeping area is separated from a lounge or sitting room by a partial wall, bookcase, or fireplace. This layout works in suites over 600 square feet and appeals to homeowners who want a true private living area separate from the main home.
Space Planning: Sizing Your Luxury Master Suite
Minimum functional sizes for luxury floor plans:
- Bedroom zone: 250–350 sq ft (enough for a king bed, nightstands, dresser, and seating)
- Walk-in closet: 100–150 sq ft per person
- Ensuite bathroom: 120–180 sq ft
- Total suite: 500–700 sq ft for a comfortable luxury layout: 800–1,200 sq ft for a high-end custom suite
Ceiling height matters as much as floor space. Standard 8-foot ceilings feel cramped in a large suite. Aim for 9–10 feet minimum, with options for vaulted, tray, or coffered ceilings over the bed or tub.
Structural considerations:
If you’re converting existing space, check whether walls are load-bearing before removal. You may need an engineer to design a beam or header to carry the load. A structural beam typically adds $1,500–$5,000+ to the project depending on span and materials.
For second-story suites, verify that floor joists can support a large soaking tub (which can weigh 1,000+ pounds when filled). You may need to double or sister joists under the tub location.
Permit requirements:
Adding or relocating plumbing, electrical, or HVAC in a master suite renovation typically requires permits. Consult your local building department early in the planning process. Inspections will cover framing, plumbing rough-in, electrical rough-in, insulation, and final finishes.
Door and window placement:
Plan door swings to avoid collisions. Pocket doors work well for closets and toilet compartments where floor space is tight. For exterior doors to a balcony or patio, French doors or sliding glass doors (minimum 6-foot width) feel more luxurious than a single 3-foot door.
Position windows to maximize natural light without compromising furniture placement. Avoid placing windows directly behind the bed unless you plan built-in shutters or blackout shades.
Design Tips for Maximizing Comfort and Functionality
Separate lighting zones. Install dimmer switches on all lighting circuits and plan at least four separate zones: ambient (recessed or flush-mount ceiling), task (vanity and closet), accent (art or architectural features), and bedside. Use LED recessed cans (4-inch or 6-inch) spaced 4–6 feet apart for general lighting.
Soundproofing pays off. Use sound-rated insulation (STC 50+) in walls between the suite and the rest of the house. Add a solid-core door (1¾ inches thick) with weatherstripping. If your bathroom shares a wall with another bedroom, consider resilient channel or double-stud framing to isolate noise.
Plan HVAC for comfort. Master suites often need their own zone on a multi-zone HVAC system so you can keep the bedroom cooler at night without freezing the rest of the house. Heated bathroom floors (electric or hydronic radiant) add luxury and prevent cold tile shock in winter. Budget $10–$15 per square foot for electric radiant.
Electrical planning:
- Outlets: Place outlets every 12 feet along walls per NEC: add extras near the bed for charging devices, in the closet for steamers, and near vanity areas.
- USB outlets: Built-in USB charging ports in nightstands or vanity areas reduce clutter.
- Dedicated circuits: Large soaking tubs with inline heaters, steam showers, or heated floors may require dedicated 240V circuits.
Smart home integration. Plan conduit or low-voltage wiring during construction for motorized shades, smart thermostats, or whole-home audio. Retrofitting control wiring through finished walls is a headache.
Storage beyond the closet. Include built-in niches in the shower for toiletries (12 × 24 inches is standard), linen storage in the bathroom (aim for 18–24 inches of depth), and under-bed storage if you’re using a platform bed frame.
Accessibility features. Even if you’re not building for aging-in-place now, consider curbless showers, blocking for grab bars, and lever-style door handles. These features don’t compromise aesthetics and add resale value. Many design galleries showcase how universal design can be seamlessly integrated.
Flooring transitions. Luxury suites often use different flooring in each zone, hardwood or carpet in the bedroom, tile in the bathroom. Plan transitions carefully. Use T-molding or reducer strips where heights differ, and align transitions under doors when possible to hide seams.
Finally, mock up the layout before construction. Use painter’s tape on the floor to outline walls, fixtures, and furniture. Walk through your morning and evening routines to test the flow. It’s far easier to adjust the plan on paper than after framing is up.