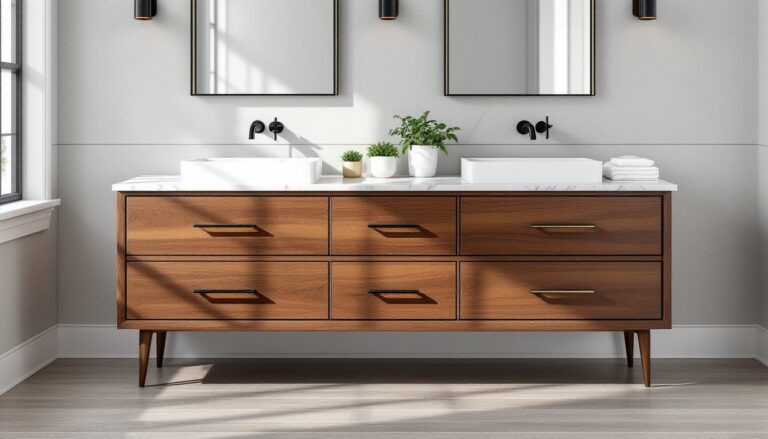
A luxury bathroom sink isn’t just about washing hands, it’s a centerpiece that sets the tone for your entire bathroom. Whether you’re gut-renovating a dated master bath or giving your powder room a high-end refresh, the sink is where craftsmanship meets daily function. Upgrading to a premium sink changes how a space feels the moment someone walks in. It’s an investment that delivers both visual impact and long-term durability, and unlike purely cosmetic upgrades, a well-chosen sink can outlast trends while handling the wear of everyday use.
Table of Contents
ToggleKey Takeaways
- A luxury bathroom sink is a statement piece and long-term investment that combines superior craftsmanship, durable materials, and design precision to enhance both aesthetics and function.
- Luxury sinks differ from standard models through thicker gauge (12–20mm), hand-finished details, premium hardware like solid brass drains, and customization options that standard builder-grade fixtures cannot match.
- Natural stone, engineered composites, cast iron with enamel, copper, and tempered glass each offer distinct maintenance requirements and visual impact—choose based on your bathroom’s use level and desired aesthetic.
- Vessel sinks make bold design statements but require tall faucets and careful splash management, while undermount and integrated designs create seamless aesthetics and work best in high-use bathrooms.
- Budget 30–40% above the sink cost for complementary fixtures, faucets, and professional installation, as undermount, integrated, and wall-mounted installations typically require licensed plumbers rather than DIY work.
- Wall-mounted and complex installations demand proper structural backing, permits in some jurisdictions, and professional expertise—attempting these without experience risks costly mistakes and potential property damage.
What Defines a Luxury Bathroom Sink?
Luxury sinks bathroom fixtures separate themselves from standard models through material quality, craftsmanship, and design precision. You’re looking at hand-finished edges, thicker gauge metals, and non-porous surfaces that resist staining and etching far better than builder-grade options.
Thickness matters. A luxury vessel sink in ceramic or stone typically runs 12–20mm thick, compared to 8–10mm for standard models. That extra mass reduces flexing, dampens sound, and just feels substantial when you set something down on the rim.
Manufacturing detail is another giveaway. Premium sinks feature glazing applied in multiple firings, hand-polished metal finishes, or stone surfaces sealed with penetrating sealers rather than topical coatings. Drain hardware is often solid brass with ceramic disc valves, not plastic or pot metal. The difference shows up in how the finish holds up after five years of toothpaste splatter and hard water.
Another defining factor: customization options. Many luxury lines offer bespoke sizing, finish matching, and integrated overflow designs that don’t disrupt the visual line. If a manufacturer offers dimensional flexibility or custom patina work, you’re in luxury territory.
Premium Materials That Elevate Your Bathroom
Material choice defines both the look and the longevity of a luxury sink. Here’s what separates the high-end from the home center.
Natural Stone: Marble, granite, onyx, and travertine deliver one-of-a-kind veining and color depth. Marble is classic but requires annual sealing and careful pH-neutral cleaners, acidic products will etch the surface. Granite is harder and more stain-resistant. Expect stone vessel sinks to weigh 30–60 lbs, so verify your vanity structure and use ¾-inch plywood or solid wood substrates, not particleboard.
Solid Surface and Engineered Composites: Materials like Corian or quartz-resin blends combine durability with seamless integration. These are non-porous, repairable with light sanding, and available in undermount or integrated configurations. They’re ideal if you want a continuous countertop-to-sink flow without grout lines.
Cast Iron with Enamel: Heavier than steel (a 20-inch sink can hit 40+ lbs), cast iron provides excellent sound dampening and a glass-smooth enamel surface that resists chipping better than acrylic. It does require proper support, use solid blocking between studs if wall-mounting.
Copper and Bronze: These living finishes develop patina over time. Manufacturers often apply a protective lacquer, but once that wears, the metal oxidizes naturally. If you want that aged look, it’s a feature, not a flaw. Clean with mild soap only, abrasives strip the patina. Copper sinks are naturally antimicrobial, which is a functional bonus.
Tempered Glass: Striking and modern, but shows water spots unless you squeegee after every use. Tempered glass can handle thermal shock, but it’s not indestructible, a dropped wrench can cause fractures. Best suited for powder rooms with lighter use.
Many high-end bathroom renovations pair luxury sinks bathroom designs with equally considered tile work that complements the sink material and finish.
Popular Luxury Sink Styles and Designs
Style dictates how the sink interacts with your vanity, plumbing, and overall bathroom layout. Here’s a breakdown of the most popular configurations.
Vessel Sinks and Undermount Options
Vessel sinks sit above the counter surface, either fully exposed or partially recessed. They’re statement pieces, great for powder rooms or spa-style master baths. Installation is straightforward: cut a drain hole, set the sink, connect the pop-up assembly, and seal the base with a bead of silicone.
Advantages: Easy to install, no undermount clamps needed, wide range of artistic designs.
Drawbacks: Counter space around the rim gets wet. You’ll need a vessel-height faucet (typically 8–12 inches from counter to spout) to clear the rim, which means wall-mount or tall deck-mount faucets. Splashing is real, plan for a backsplash or be prepared to wipe down daily.
Undermount sinks attach beneath the countertop, creating a seamless transition and making countertop cleanup easier, you just wipe debris straight into the sink. Installation requires a solid surface countertop (stone, quartz, solid surface) and mechanical clips or epoxy anchoring. This isn’t a DIY-friendly install unless you’ve got a router, template, and experience with adhesive curing times.
Best use case: Undermounts shine in high-use bathrooms where cleanliness and streamlined aesthetics matter. They pair beautifully with book-matched stone slabs and luxury design concepts that prioritize visual continuity.
Integrated and Wall-Mounted Designs
Integrated sinks are molded as one piece with the countertop, no seam, no caulk line, no place for grime to hide. Common in solid surface and cast concrete installations. If you’re going custom, this is the route for a ultra-modern, maintenance-light setup. Fabricators typically template on-site and install as a single unit.
Wall-mounted sinks float off the floor, creating an airy, accessible look. They’re ADA-friendly when installed at the right height and leave floor space open for cleaning or wheelchair access. The trade-off: all your plumbing is exposed unless you add a shroud or in-wall carrier system.
Installation notes: Wall-mounted sinks require solid blocking behind the drywall. Use 2×8 or 2×10 lumber spanning at least two studs, installed during framing or retrofitted by cutting access and patching. The sink bracket must hit solid wood, drywall anchors won’t cut it for a 30-pound sink plus water load. If you’re working in an existing bathroom and don’t have access from behind, hire it out or plan to open and patch drywall.
These styles pair well with statement faucets and minimalist interiors that let the fixture be the focal point.
Choosing the Right Luxury Sink for Your Bathroom
Picking a sink isn’t about falling in love with a showroom display, it’s about matching form, function, and your bathroom’s structure.
Measure your vanity first. Standard vanity tops are 22 inches deep. Your sink should leave at least 3 inches of clearance from front edge to sink rim, and 4–6 inches on sides if it’s a drop-in or vessel style. For undermounts, verify the countertop overhang won’t interfere with cabinet doors or plumbing access.
Match sink depth to use. Shallow vessel sinks (4–5 inches deep) look sleek but splash easily. If this is a kids’ bathroom or a high-use space, go for 6–7 inches of depth. Undermount and integrated sinks typically run 5–7 inches, enough to contain splatter without feeling like a bucket.
Consider faucet compatibility. Some luxury sinks don’t include pre-drilled faucet holes, they’re designed for wall-mount or deck-mount installations where you control placement. If your sink has no faucet holes, plan to either install a wall-mount faucet (requires in-wall plumbing rough-in) or use a deck-mount plate on the counter. Drilling through stone, glass, or solid surface post-purchase is not a DIY job, those materials crack under improper drilling pressure and speed.
Think about maintenance. Natural stone and copper require regular sealing and pH-neutral cleaners. Glass shows every water spot. Cast iron enamel is tough but can chip if you drop something heavy. Solid surface and vitreous china are the most forgiving for busy households.
Budget for the full install. A luxury sink often runs $400–$2,500+, but don’t forget the matching faucet ($250–$800), pop-up drain assembly ($40–$150), and P-trap if you’re switching configurations. If you’re doing custom countertop work, add fabrication and templating costs. Many designers featured on platforms like Home Bunch recommend budgeting 30–40% above the sink cost for complementary fixtures and installation materials.
Installation Tips and Professional Considerations
Luxury sinks often involve nonstandard plumbing, heavier weights, and finishes that don’t forgive installation mistakes. Here’s when to DIY and when to call in help.
Vessel and drop-in sinks are the most DIY-friendly. You’ll need:
- Adjustable wrench and basin wrench for trap and faucet connections
- Silicone sealant (clear or color-matched)
- Plumber’s putty for drain assembly (unless the manufacturer specifies silicone-only)
- Level to verify the vanity is flat before setting the sink
Test-fit everything before applying sealant. Hand-tighten the drain flange, connect the P-trap, and check for leaks by running water for 2–3 minutes. Then disassemble, apply sealant, and finalize.
Undermount and integrated sinks are typically pro territory unless you’ve got countertop fabrication experience. The cutout must be precise, off by ¼ inch and you’re exposing unfinished substrate or cracking the stone. Fabricators use CNC routers and diamond tooling: a jigsaw isn’t going to cut it (literally).
Wall-mounted sinks require structural backing and knowledge of your wall assembly. If you’re not comfortable opening drywall, routing supply lines, and ensuring the bracket hits solid wood, hire a licensed plumber. An improperly mounted sink can rip out of the wall under load, and your homeowner’s insurance may not cover damage from DIY structural work.
Permits: Most jurisdictions don’t require permits for like-for-like sink replacements. But if you’re moving plumbing, adding new drain lines, or doing structural reinforcement (like adding blocking for a wall-mount), check with your local building department. Commercial or multi-family work almost always requires permits and licensed trades.
Safety notes: Wear safety glasses when cutting tile or drilling stone. Use gloves when handling silicone and plumber’s putty, both can irritate skin. If you’re cutting or grinding natural stone, wear an N95 or P100 respirator, silica dust is a serious respiratory hazard.
For complex installs involving custom countertops or in-wall carriers, get at least two quotes from licensed plumbers or fabricators. A botched install on a $1,200 sink is an expensive lesson.